
Table of Contents
INTRODUCTION
This guide details proven methods to earn sustained success on Pinterest for food bloggers. Follow our suggestions and you’ll establish a presence on Pinterest in as little as 30 days. At 90 days, you’ll have measurable growth. And at six months, you’ll have sustained traffic to your website.
We offer you no tricks or hacks, no shortcuts.
But if you’re willing to put in the effort, working for at least a couple of hours every week on your Pinterest account, your food blog can earn a steady flow of free traffic.
Here’s the harsh truth about Pinterest:
Pinterest is interested in providing beautiful images, inspiration, and up-to-date information to its users. If you can help it to do that, the Pinterest algorithm will reward you with lots of free exposure which results in a steady flow of organic traffic to your website.
If you can’t, oh well.
Pinterest does not exist to provide you with free traffic to your website.
Trying to trick or hack the Pinterest algorithm might earn food bloggers some small bursts of traffic but not sustained success.
It’s a simple case of “you scratch my back and I’ll scratch yours.” So long as you remember that as a food blogger you have to scratch Pinterest’s back first and frequently, you’ll be fine.
For this guide, we assume that you already have a business Pinterest account, and know how to create boards and pins.
CONTENTS
- Pinterest Basics
- Who Uses Pinterest?
- Why Pinterest?
- Quick Results
- Direct Traffic to Your Website
- How Pinterest Works
- How to Keep Pinterest Happy
- Keyword SEO
- Pinterest Bio
- Pinterest Boards
- How Many Boards to Have
- What to Name Your Boards
- Board Descriptions
- All About Pins
- Images
- Design Elements
- Fonts
- Pin Titles
- Pin Descriptions
- Idea Pins
- Video/Animated Pins
- URL
- Creating Pins and Using Templates
- Schedule 1
- Schedule 2
PINTEREST BASICS
Who Uses Pinterest?
The Pinterest audience is looking for both inspiration and solutions. Users are generally women on mobile devices. They have higher-than-average income and they tend to buy online, including products they see on Pinterest.
They look for food recipes often and make excellent potential readers for food bloggers.
Why Pinterest?
Pinterest should definitely be the first platform food bloggers focus on for traffic because it offers quick results and directly feeds traffic to your website.
Quick Results
Pinterest, like Google and YouTube, is a search engine.
It takes at least nine months and usually closer to a year, for a website to accumulate enough posts or videos to start to be noticed by Google or YouTube. That means, on average, it takes a year for Google or YouTube to provide traffic to your website.
Pinterest, on the other hand, can notice your pins from day one. And within as little as 30 days, with a good effort on your part, your pins can be seen by thousands of Pinterest users.
Food is one of the most popular topics on Pinterest. That, along with the quick ranking time and visual nature of the platform, makes it perfect for food bloggers.
Direct Traffic to Your Website
Unlike other platforms, Pinterest doesn’t try to keep users on the platform. It allows users to click on one of your pins and be taken directly to a blog post on your website. One click, and they’re there.
Instagram, on the other hand, is designed to keep users on Instagram. In order to get to one of your blog posts, users have to click on your name in the Instagram post, go to your profile, click on the link in your bio which will take them to your website where they can search for the blog post. It takes a click, a search, another click, then some more searching to get from Instagram to your blog post.
HOW PINTEREST WORKS
Pinterest uses AI to “read” your pins. It looks at your image, text overlay, pin title, and pin description. It looks at the board the pin is posted to, examining the board title and board description. When the keyword terms in all those areas match, it’s ranked well.
Pinterest follows the pin to the URL it’s linked to and tries to determine if the pin relates to the linked blog post and website. Again, if everything matches, it’s ranked well.
A well ranking pin is shown to more Pinterest users than a low ranking pin. If the initial group of users respond well, it’s shown to even more users. A good response by them means even more exposure.
A bad response means less exposure.
A user’s feed is filled with pins that match topics or keywords that the user has searched for in the past. The user’s board titles also give Pinterest an indication of what the user is interested in.
KEYWORD SEO
Here’s why food bloggers need to master Pinterest Search Engine Optimization.
In the graph below, the top line is Pinterest search for “dinner ideas.” The bottom line is Pinterest search for “recipes for dinner.” The two terms mean basically the same thing but one obviously has much better search results.
As a food blogger, you need to know if you should name a Pinterest board “Dinner Ideas” or “Recipes for Dinner.”
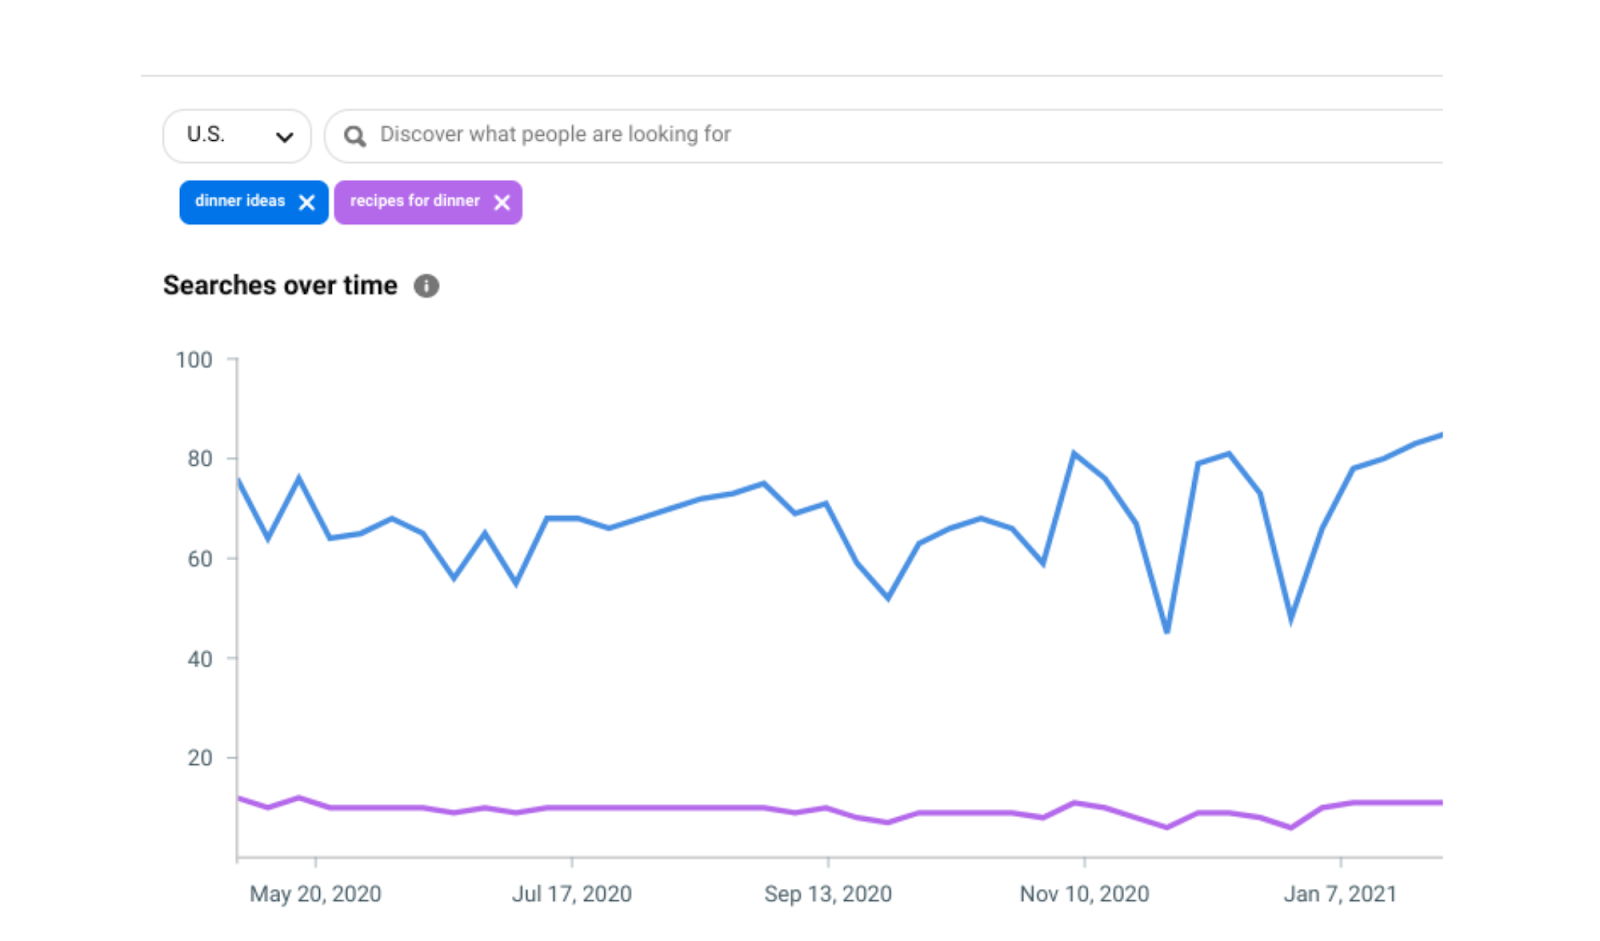
The two terms mean pretty much the same thing but “Dinner Ideas” will get much more attention from Pinterest. A small change in the way you word something can mean a huge difference in Pinterest traffic.
Depending on your point of view, Search Engine Optimization can seem to be utterly boring or completely overwhelming. We get it. And yes, it does take some time but the payoff can be enormous.
We think of working on Pinterest SEO as learning how to speak Pinterest’s language. And when we speak Pinterest’s language, Pinterest can understand us. When it understands us and understands what our pins are about, it can get our pins in front of the right users.
Chances are you’ll have a handful of main keywords. As a food blogger, you may focus on vegan recipes, meatless recipes, kid-friendly recipes, and freezer meals. Most of your recipes fall into one of those four categories so those are your main keywords.
You’ll use your main keywords for your Pinterest bio, board titles, and descriptions, as well as pin titles and pin descriptions.
Pinterest keyword research tells you two things. It tells you exactly what users are searching for when they visit Pinterest. It also tells you what terms Pinterest already understands and uses.
Match the words you use to describe your pins and board to the terms Pinterest users are searching for and you’ll have a good chance the Pinterest algorithm will show your pins to those users.
Matching your pin titles and descriptions to the terms Pinterest already understands and uses ensures that Pinterest understands what your pin is about, again, that increases the chances that the Pinterest algorithm will show your pins to users.
People search differently on Google than they search on Pinterest. You can’t just take your Google keyword research and apply it to Pinterest. You should do your keyword research for Pinterest on Pinterest.
Luckily, there are several ways to do keyword research on Pinterest.
First, we’ll use the search feature (top, right of your home screen) and enter a keyword. Pinterest will auto-fill several suggestions in a drop-down menu, much like Google.

For this first example, we show you how we found our keywords. We’ll also show you how we keep track of our keywords, in a spreadsheet.
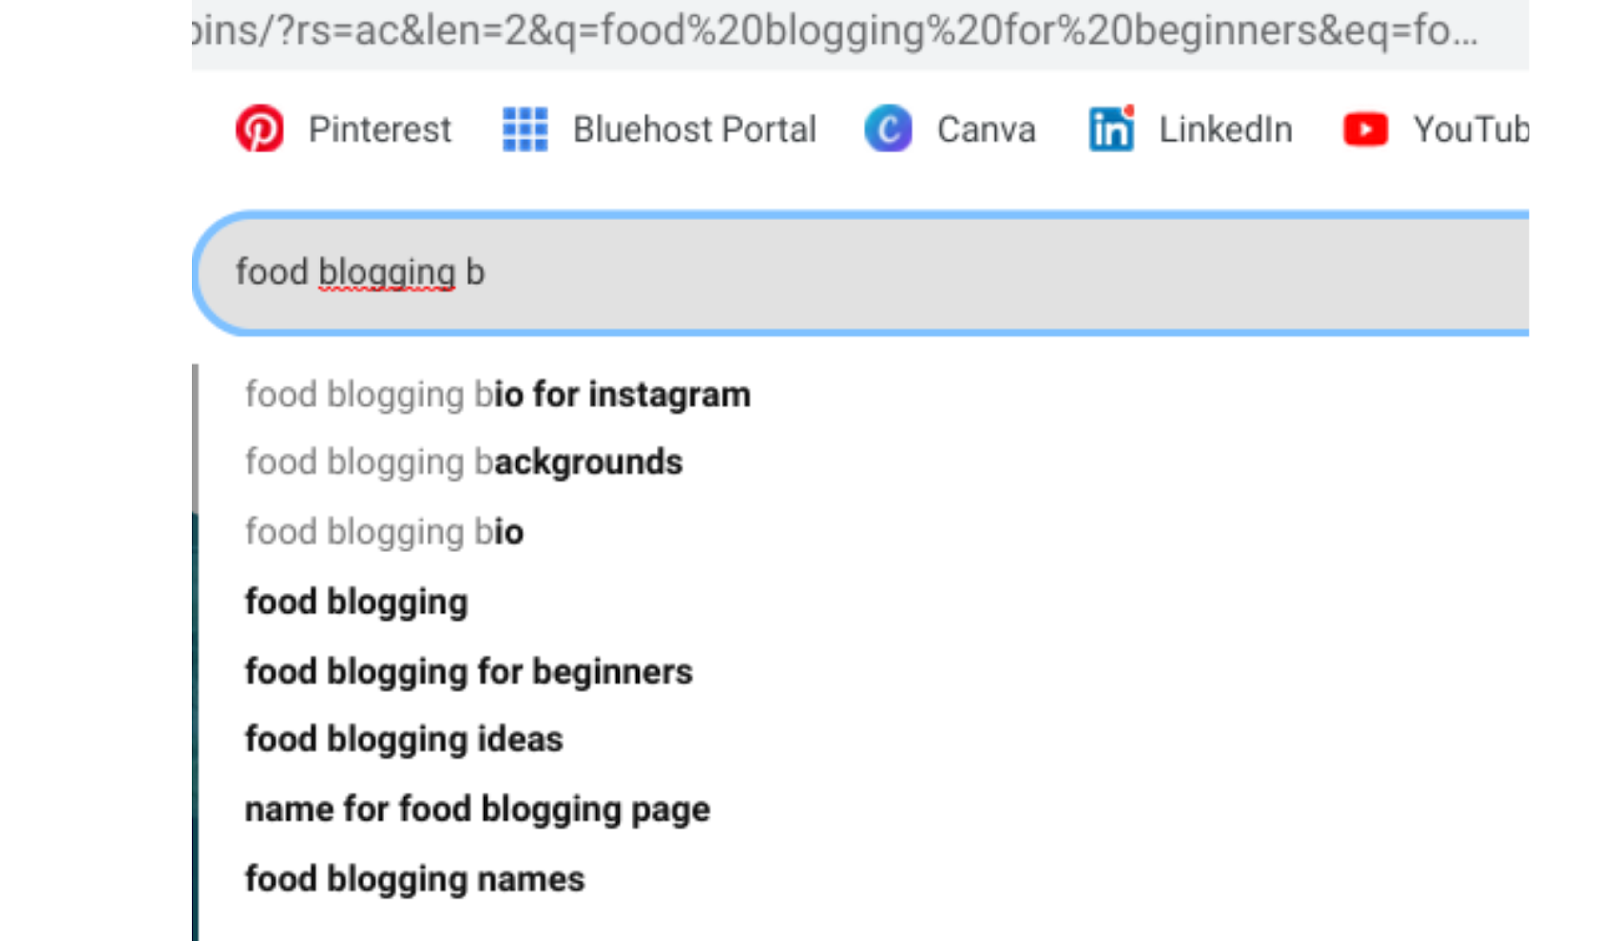
We entered “food blogging,” which is the main topic of our website. We got several suggestions including “for beginners,” “ideas,” “tips,” “names,” “photography,” “Instagram,” and “ideas Instagram.”
For us, “food blogging” is our main keyword. The suggestions, “for beginners,” etc., would be level 1 keywords. We enter “food blogging” in the first line of a spreadsheet. We enter the level 1 keywords in each column.

Then we explore each level 1 keyword and find level 2 keywords.
Level 2 keyword is a bit of a misnomer here. Keyword phrase is better. You don’t want one-word terms when searching for level 2 keywords. You actually want three or four-word terms. “Vegan Thanksgiving desserts” is much better than just “vegan” or “desserts.”
The same is true for “quick healthy kid-friendly snacks,” which is much better than just “quick snacks.”
Next, we entered “food blogging for beginners” in the Pinterest search field. It gave us hundreds of pins related to the topic.

The text overlays give us suggestions for keyword phrases. We see “How to start a food blog,” “SEO Tips for food blogs,” and “Mistakes new food bloggers make” on the first row. We’ll keep scrolling and add the keyword phrases to the spreadsheet.

We’ll keep going, making similar searches for “food blogging ideas,” “food blogging tips,” and so on. We’ll add ten or more keyword phrases under each level 1 keyword.
Note: We won’t alphabetize the keyword phrases! Pinterest shows the most popular ones first, so we’ll keep them in the order we find them.
Our second search method also utilizes the Pinterest auto-suggest. We’ll also enter our main keyword in the search bar, add a space and then add a letter, allowing Pinterest to suggest more keyword phrases. We run through the entire alphabet. We’ll add these keyword phrases to our spreadsheet. (These suggestions are usually too long to be level 1 keywords.)
Food blogging won’t be your main keyword, of course. As a food blogger who develops recipes or reviews restaurants, you’ll have different main keywords.
You might have three or four main topics, depending on your website and brand, each one will become a main keyword.
Your first main keyword should be the main topic of your website. What do you most want to be known for?
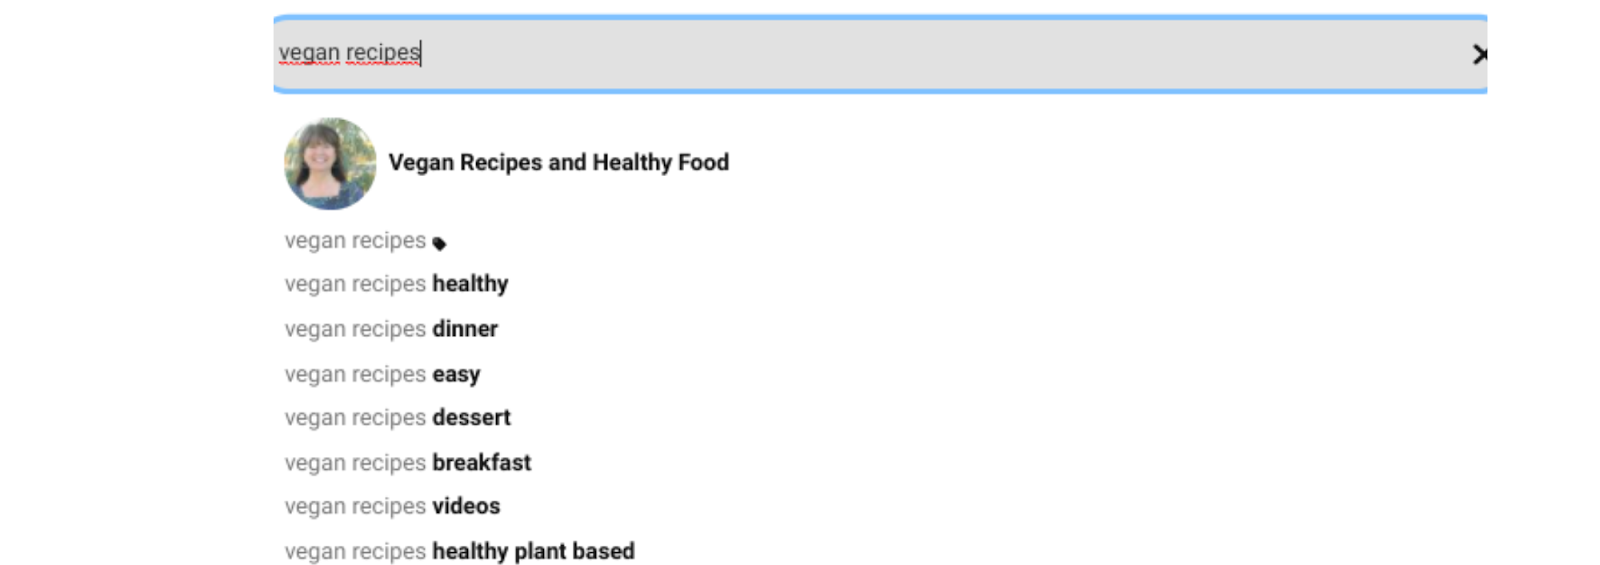
Maybe your website focuses on vegan recipes. “Vegan recipes” would be a main keyword.
You’d enter “vegan recipes” in the Pinterest search bar. You’d get a dropdown menu with suggested level 1 keywords. Your result might look something like this.
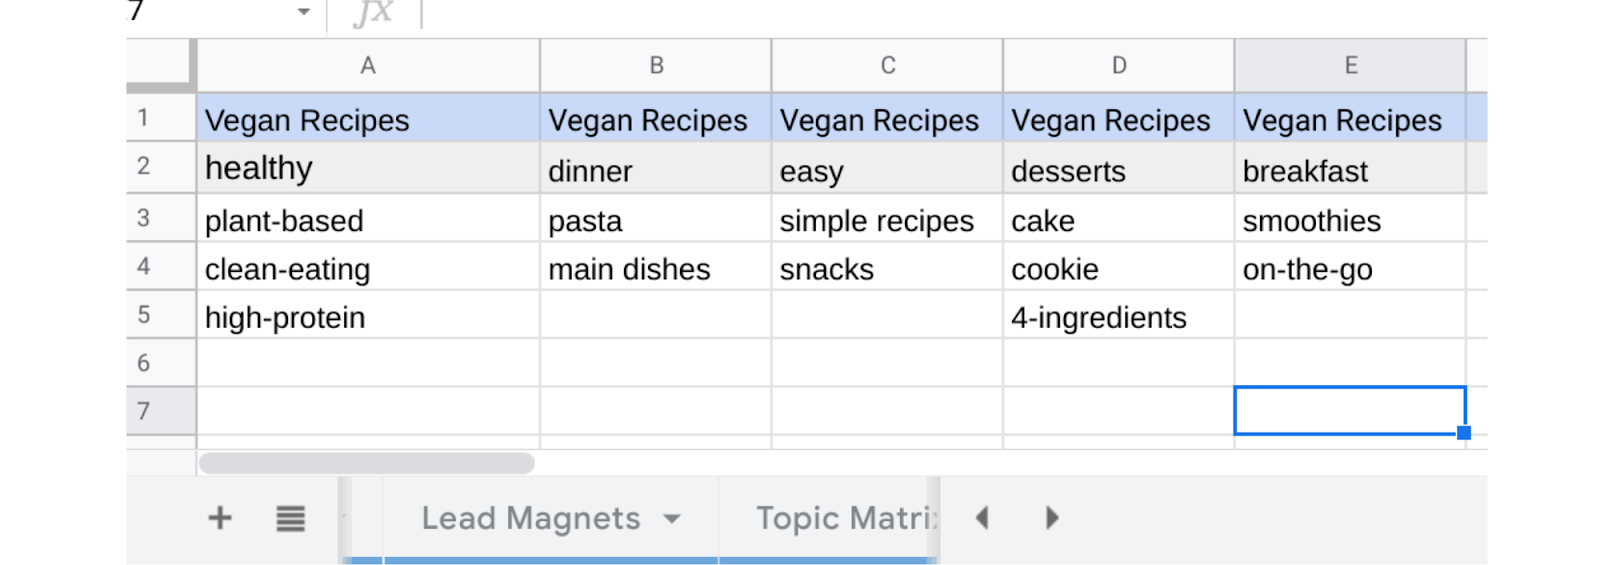
Search each term for keyword phrases. (Stay in the search bar. Unlike our “food blogging” search, individual pin text overlays or pin titles won’t be much use to you since they’ll be recipes not topics.) It might look something like this.

Create your own spreadsheet with your main keyword on the first line. In our example, it’s “vegan recipes.” The level 1 keywords should head columns under the first line. Fill in keyword phrases under each level 1 keyword. It might look something like this.
Try to find seven or more level 1 keywords for each main keyword and try to add ten or more keyword phrases for each level 1 keyword. (Yes, that’s a lot of searching and a lot of keywords and keyword phrases. That’s why we recommend using a spreadsheet to keep track of them.)
Another way to search for keywords is to use the Pinterest Trends option. You’ll find it at https://trends.pinterest.com/.
Trends can show you if a keyword has increased or decreased in popularity over time. We find it most useful in comparing terms, as in the “Dinner Ideas” vs “Recipes for dinner” example above.
Another keyword search tool, the most robust keyword research tool on Pinterest, is the ads creation tool. Go through the motions of creating an ad using your keyword. Among the search results, you’ll see a much more accurate indication of how many people are actually searching for the keyword. (Don’t forget to opt-out of the ad-making process before you have to pay for it!)
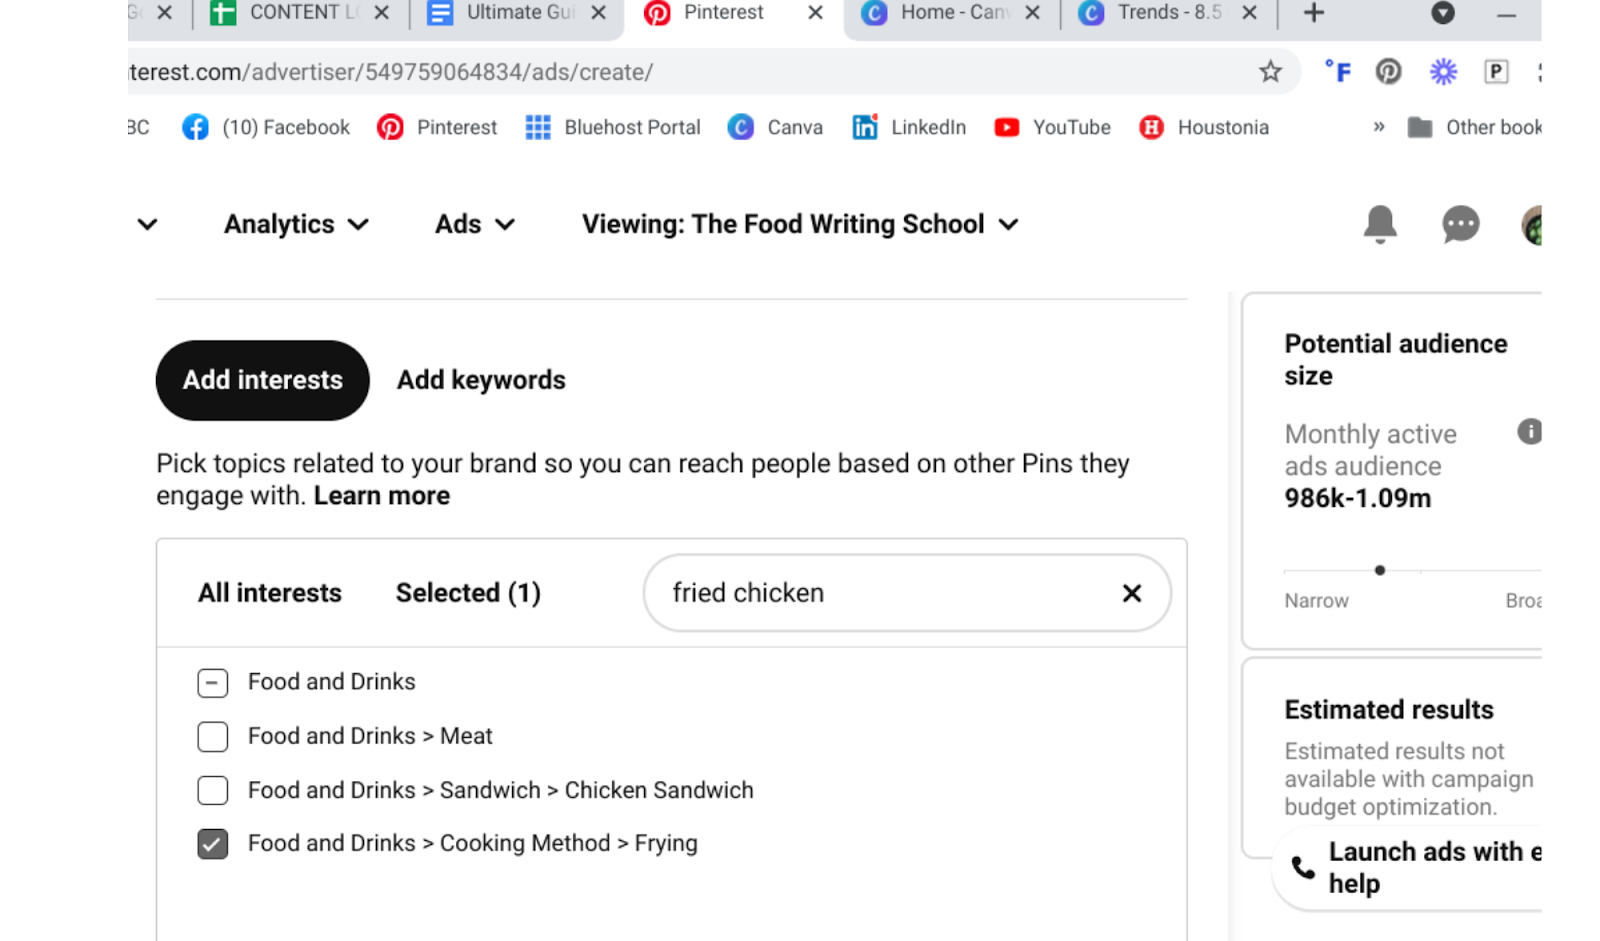
On the right, you’ll see a potential audience of 986K to 1.09M for “fried chicken.” This is the only search method on Pinterest that gives you an estimated potential audience size.
The keyword spreadsheet you’ll create by following these guidelines is a great start but it’s by no means final. You’ll add and subtract keywords as you go along. Some keywords, even if they are popular on Pinterest, just won’t fit your content.
Remember, don’t alphabetize the keyword phrases. Pinterest shows you the most popular ones first.
Your main keyword will be used in your Pinterest bio. Level 1 keywords will be used in your board titles. Keyword phrases will be used in your pin titles and descriptions.
Keywords are for the Pinterest algorithm. But remember, you’re also writing for human beings. You’ll mix the keywords with power words and emotion words to appeal to your readers when you create pin titles and pin descriptions.
Use the keywords naturally; no keyword stuffing.
PINTEREST BIO + PROFILE
There are several pieces to your Pinterest bio and profile. We want to optimize each section in order to tell Pinterest and users the most about you and your brand as possible.
Let’s start with your name. Of course, you’ll use your name or brand name but that’s just to start. There’s space after your name to include a few keywords. Again, this is free real estate. Use it.
Our Pinterest name is: The Food Writing School / Online Classes + How-to Guides. It gives users our name and also gives them an idea of what we do.
Next comes your bio. Your website and Pinterest user name are included here. That’s followed by a short bio. You have only 160 characters for your bio, so use the space wisely. There’s no room for an introduction; just get to it. Introduce yourself and what you do. Use as many keywords as you can.
Our bio reads: thefoodwritingschool.com·@FoodWritingSchool·We take you from foodie to food writer with online classes, webinars, how-to guides, publications and more. Launch your food blog or expand your reach with us.
Normally, we would add a comma between the words “publications and” to make it “publications, and more.” But that would take us over the 160 character limit. You might have to sacrifice a little bit on the punctuation or style of your bio in order to keep it short enough.
There’s also your profile photo. If your website is tied to you, use a clear headshot. If your website isn’t tied to you, you can use some other image that represents your brand.
Since we’re a team of editors and not just one person at The Food Writing School, we use an image that represents our brand. Our profile photo is a fork with a bit of pasta on it.
And finally, there’s your cover photo. If you don’t insert a cover photo, a collage of your recent pins will appear here.
We have a cover photo. The revolving default display of pins isn’t something we can control and the mix isn’t always as pleasing as we’d like so we opted for a cover photo.
PINTEREST BOARDS
How Many Boards to Have
If you’re just starting your Pinterest account, be sure to create at least ten boards that are highly relevant to your main keywords when you begin.
You can also create a brand board where all the recipes you develop are pinned. It should be the last board you pin your recipes to.
Add more boards as necessary and appropriate but don’t create boards just to fill your account. Make them all highly relevant.
Most successful accounts we see have at least 40 well-populated, relevant boards.
How many boards should you have? Take a look at your website. How many categories does your blog have? Let’s say you have five categories that cover most of your blog posts and five more categories that you rarely use.
Ideally, you should have at least five boards to post each pin to. You’ll want to create five boards for each of the five categories that you use often.
Don’t feel you have to create them all in one day. It would be better to create ten boards and completely fill in the board descriptions than to create 25 boards that just have titles and no descriptions.
What to Name Your Boards
When you create boards, be sure to name them using relevant level 1 keywords. Nothing cute, no fluff.
Something like “Easy-peasy Eggolicious Omelettes” is fine for your personal Pinterest boards but for your business boards, it’s a complete failure. Pinterest will read that board title and be confused. Users will read it and expect the recipes to be written in baby talk.
A better board title would be “Easy Omelettes.” It’s simple, straightforward, and absolutely clear. True, it’s not cute, but it is easy for the algorithm and users to understand.
Remember the goal of SEO is to make sure Pinterest understands what your pins are about, and not to win any writing awards.
Feel free to create boards with similar titles and topics. You could create “Easy Breakfast Dishes” to go along with “Easy Omelettes.”
That would give you two relevant boards to pin an omelette recipe. You want five boards, at least, to post a pin to.
You can create general boards to give yourself even more options such as “Breakfast Recipes,” “Dinner Dishes,” and “Chicken Recipes.” Check your board titles in the Trends section to make sure you have the most searched for terms.
Board Descriptions
After you’ve created the boards, you’ll have to go back to each board and add board descriptions. (Pinterest doesn’t allow you to add board descriptions at the same time you create the board.) Use highly relevant keywords in the board descriptions. The algorithm checks board descriptions. This is free real estate, use it to further define your brand.
Once you create a board, Pinterest will suggest some pins for you to add to it. This is one of the few times that we suggest adding someone else’s pins to your boards. Add up to 20 pins that are highly relevant to the board. It will help Pinterest understand what the board is about.
One More Note About Boards
Never post a pin to an irrelevant board. Ever. Don’t pin a fried chicken recipe to a board named Easy Omelettes, for example. It confuses the algorithm.
If you’ve accidentally pinned something to an irrelevant board, simply move it to a more relevant board. If you don’t have a more relevant board, create a secret board and move the pin there.
You can also delete the pin, but that creates a broken link for anyone else who has saved your pin. That’s not good. Just move it.
PINS
Pin Images
Each pin you create should have a unique image.
If you’re a recipe developer, you should photograph every step as you make the dish. You should also take plenty of photos of the finished dish.
If you’re a restaurant reviewer, you should photograph the meals you are reviewing.
In addition to that, you can find plenty of free stock photos of food and cooking. Canva has free images that you can use.
Another good source for free stock photos is Pixabay.
For even more images, be creative in the way that you crop photos. One photo of a dish can be cropped into several images. Flip them horizontally or vertically, remove the backgrounds for even more versions. (Canva can do all of that.)
Pinterest AI reads the images on your pins. Make sure your images are easy to understand.
If you have a pin that’s linked to a fried chicken recipe, don’t use an image of a family sitting around a dinner table that’s been set with a platter of fried chicken, serving bowls of mashed potatoes, green beans, and gravy, salad, rolls, wine, iced tea, and a centerpiece of flowers. Pinterest might understand “dinner table” or “family at dinner” but not “fried chicken.”
Don’t use images that are symbolic. If you’re using an image of a group of people standing and clapping to show that your fried chicken recipe is worth a standing ovation, you’ll only confuse Pinterest. And your audience, likely.
Design Elements
Use design elements such as arrows to call attention to your call to action on your pin’s text overlay.
Play with the element’s transparency level for even more variety.
Fonts
Use script fonts sparingly, for small accents and not for the bulk of the pin overlay text. Use sans serif fonts that are easy to read. Don’t crowd the space.
Text Overlays
Be direct in your text overlay. Nothing cute or cryptic. Pinterest users are scrolling past dozens if not hundreds of pins, they need to quickly see what your pin is about.
Think of the text overlay as the pin’s headline.
Remember that you want the user to stop, click on the pin, and hopefully click through to your website. You want to give them enough information to be interested in your pin but not so much information that they don’t have to click through to your website.
Pin Titles
Use your keyword phrases for your pin titles.
Pin titles should be around 40 characters long. You have 100 characters available for your pin titles but users can only see the first 30 to 50 characters, so 40 is a good number to shoot for.
Pin Descriptions
Use your keyword phrases for your pin descriptions.
Pin descriptions should include your brand name, an explanation of what the pin is about, and a secondary call to action (telling the user what to do, such as click through to your website or sign up for your newsletter, whatever’s appropriate).
You have 500 characters for your pin description. We suggest you keep it closer to 100 for maximum readability.
Idea Pins
Idea pins can be a combination of video, animated, and still images. The images transition one from another, usually with text laid out in a cohesive way that tells a simple narrative. They are great at increasing impressions … but … and this is a big but … there’s no link to your website on an idea pin. Users can normally click on a pin and be taken directly to your website. Not so with idea pins. At the end of the narrative, the user stays on Pinterest. No traffic for you.
Resist the urge to add a website link to your idea pins! Pinterest isn’t providing one, for whatever reason, and you trying to figure out a work around, is working against the algorithm rather than with it. (Remember what we said about scratching Pinterest’s back before expecting it to scratch yours?)
Adding a website link likely decreases the reach of the idea pin.
Video/Animated Pins
Video and animated pins get lots of attention on Pinterest. The algorithm promotes them and users like them. They are especially useful for how-to’s. You can show how to beat egg whites, for example.
Unlike idea pins, the video pins do have click-through capabilities. The user can click on the pin title or pin description, but neither field is obvious as a live link. They aren’t highlighted in blue and they aren’t underlined. Users may not know the fields are live links so again, no traffic for you.
With video pins, it’s up to you to create a call to action that will direct the user to visit your website. It can be as simple as “Click on the Pin Title to Be Taken to the Website!”
Again, resist the temptation to add a website link. Simply direct your viewers to click on the pin title or pin description.
URL
Pinterest checks the URL of your pin; it wants to make sure that the URL destination delivers on what you promised in the pin. A fried chicken recipe pin should link to a URL that’s about fried chicken.
If Pinterest follows your fried chicken pin’s URL and it’s a step-by-step guide to changing the oil in your car, the platform considers that a fail.
CREATING PINS AND TEMPLATES
Using Pin Templates
We use Canva, an online graphic design tool, to create our Pinterest templates. There’s a paid version but the free version should be more than enough to start.
Canva offers hundreds of free templates. Pick twenty to thirty templates that you like and save them in a folder. Add more templates as you go on.
Search for “Free Canva Pinterest Templates” on Google; you should find plenty. Designers offer free templates in the hope that you’ll be so happy with them that you return to buy more. The templates should be compatible with Canva. (Always make a copy of the templates before you use them.)
Between Canva and the free templates you get from designers you should have plenty to use.
The two pins below are made from a template. For this example, both pins link to the same blog post. Technically, they are different pins because they have different images.
True the pins definitely establish a brand, but they are much too similar to be successful, especially for the same post.
If a viewer sees the pin on the left and then sees the one on the right, they’ll think they are the same pin and won’t bother to pay much attention to the second pin. Having your pins ignored isn’t the goal.

Here’s a much better way to use templates. Use the template once for a blog post. Change the colors and design elements at the very least before you use it again for another post several weeks later.

Creating a Pinning Schedule
Pinterest wants “fresh pins.” A fresh pin is a pin using an image that Pinterest has never seen before. It can link to the same blog post, and have the same pin title and pin description so long as it has a new image.
Of course, you’ll want to vary fonts, colors, and design elements, as well as pin titles and pin descriptions to keep your pins truly fresh.
We recommend that you create as many as twenty pins or more per blog post or piece of content. If you’re a recipe developer, getting twenty images should be easy if you take photos of the cooking process as well as the finished dish. Incorporate different photo angles, move in for close-ups, and move out for flat lays.
You can schedule your pins directly on the Pinterest platform. Or you can use a scheduling tool like Tailwind or Planoly, both of which have free and paid versions. And you can even schedule your pins in Canva, the design tool we recommend for creating marketing and social media material including Pinterest pins.
We suggest you create ten to 20 pins per piece of content if you can, but we understand that sometimes five or ten pins per piece of content may be all you can produce.
We also suggest you pin between five and 20 pins daily.
Here’s the only rule about pinning: Post only one pin from a URL per day. More than that, and Pinterest might consider it spam-like behavior. So one pin from a URL per day.
Wait, what? One pin from a URL per day? How are you supposed to pin 20 pins a day?
Hopefully, you have five to ten blog posts on your website when it goes live. So that’s five to ten to start. Also, you can create idea pins, which don’t link to a URL. As you create content, you’ll add pins to your schedule.
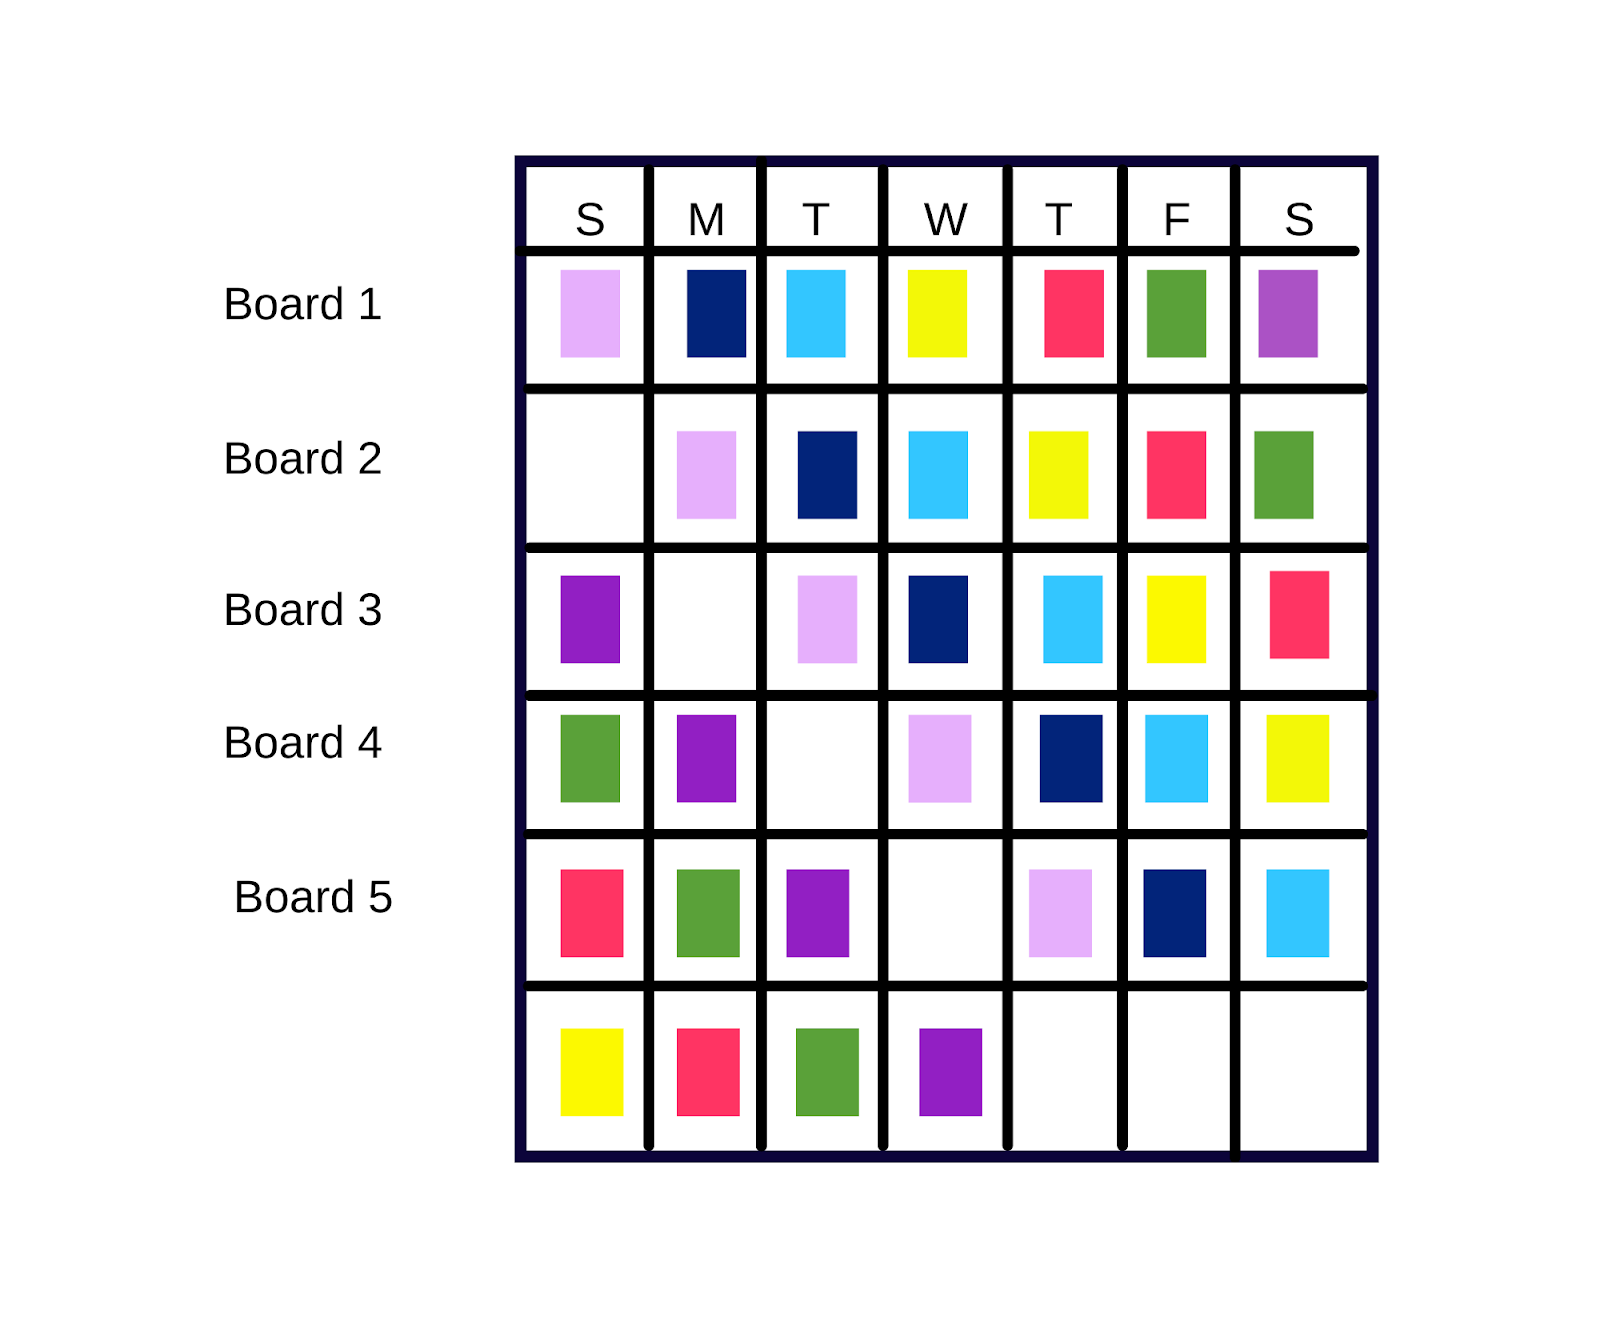
There are various pinning schedules. We have two examples below.
In this example, we have one piece of content (one URL), and we’ve created five pins and have seven relevant boards. We post pin number one once a day to each of the seven boards, starting with the most relevant board. Then we skip a day and start to post pin number two once a day to each of the seven boards. We continue posting pins, one a day until all of the pins have been posted to all of the boards.

In the next example, we have one new piece of content (one URL). We’ve created seven pins for it and have five relevant boards (that’s the minimum number of boards any pin should be posted to, by the way). In this example, we’re going to post each pin, one pin per day, to board number one, the most relevant board. When we’ve posted each pin to board number one, we skip a day and then start posting each pin to board number two, again, one pin a day. We repeat the pattern until all of the pins have been posted to all of the relevant boards.
If you have fewer pins and more boards, the first schedule is best.
If you have lots of pins and fewer boards, the second schedule is best.
Both schedules give you consistent coverage so use whichever one you’d like.
Be sure to check out our post Pinterest Tips for Food Bloggers for a list of Do’s and Don’ts that will make your pinning even more effective.

2 thoughts on “The Ultimate Pinterest Guide for Food Bloggers”
Comments are closed.